Adapted Controllers & Prosthetic Devices
Controllers
Nintendo Wii U Pro
Our Wii U Pro controller adaptation allows the user to play games using only their right or left hand. Depending on the side of the controller being used buttons are placed on the bottom side of the controller that can be accessed using all fingers but the thumb. The adaptation process involves mounting buttons on the bottom of the controller connected to the corresponding buttons on the left side if it is right-handed or the right side if it is left-handed. A 3-D printed joystick extender is mounted on the left-side joystick for right-handed adaptation and vice-versa if doing the left-handed adaptation. Using the controller with a single hand utilizes your thumb for the accessible face buttons, your index for the shoulder buttons, and the rest of your fingers to do as you like on the buttons on the back of the controller. Typically with the joystick extender, you will hold it close to your chest to manipulate it by physically moving it along your body.
Nintendo GameCube
Our GameCube controller adaptation allows the user to play games using only their right hand. The main joystick, originally on the left side of the controller, is essential because it controls the direction of the player’s movement on the screen. During our adaptation process, we remove this joystick from the left side and use 3-D printed parts to remount it to the back of the right side. When playing, the user holds the right handle of the controller with their right hand. The A, B, X, Y, and start buttons as well as the c-stick can be reached using their right thumb. The R and Z buttons can be reached using their right pointer finger. The controller is held so that the mounted joystick is held against a flat surface such as a table or the user’s leg. To move, the player pushes the controller in the desired direction, using friction to displace the joystick from its original position.
Super Nintendo Entertainment System (SNES)
The SNES Adaptive Controller removes the board from the original controller case and solders female jacks in place of the original buttons. Our new standard SNES 3D printed case houses the jacks and board.
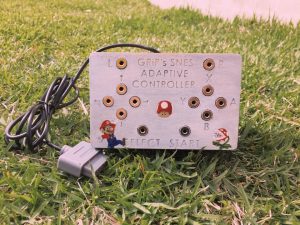
Customizable 3D-printed switches are plugged into each jack to represent the original button; these can be requested from us. The SNES case itself can be modified to accommodate a variety of abilities. Simply place the controller on a flat surface, plug in your new switches, plug in your new controller, and play.

Sony Play Station 4 (PS4)
Existing PS4 controllers are adapted for single-hand usage. Buttons are moved to different locations on the controller and trigger extenders are added to the L2 or R2 buttons so the devices are completely functional with one hand. Left or right-handed controllers can be requested and buttons can be switched with jacks if needed.
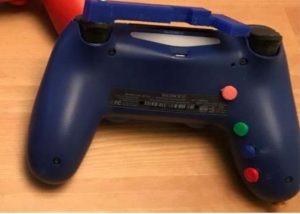
To use our controller, the user can move the device against a part of their body, like the shoulder, to control one joystick and use their hand to control the other joystick. Joystick extenders are available to customize the device for additional comfort.

Moreover, with the relocated buttons and trigger extenders the user can then access all buttons with their fingers while holding the controller in their hand, including L1, L2, R1, and R2. Our team is currently developing a new method that removes a joystick from the controller to allow further customization.
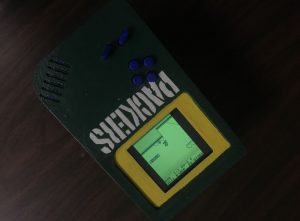
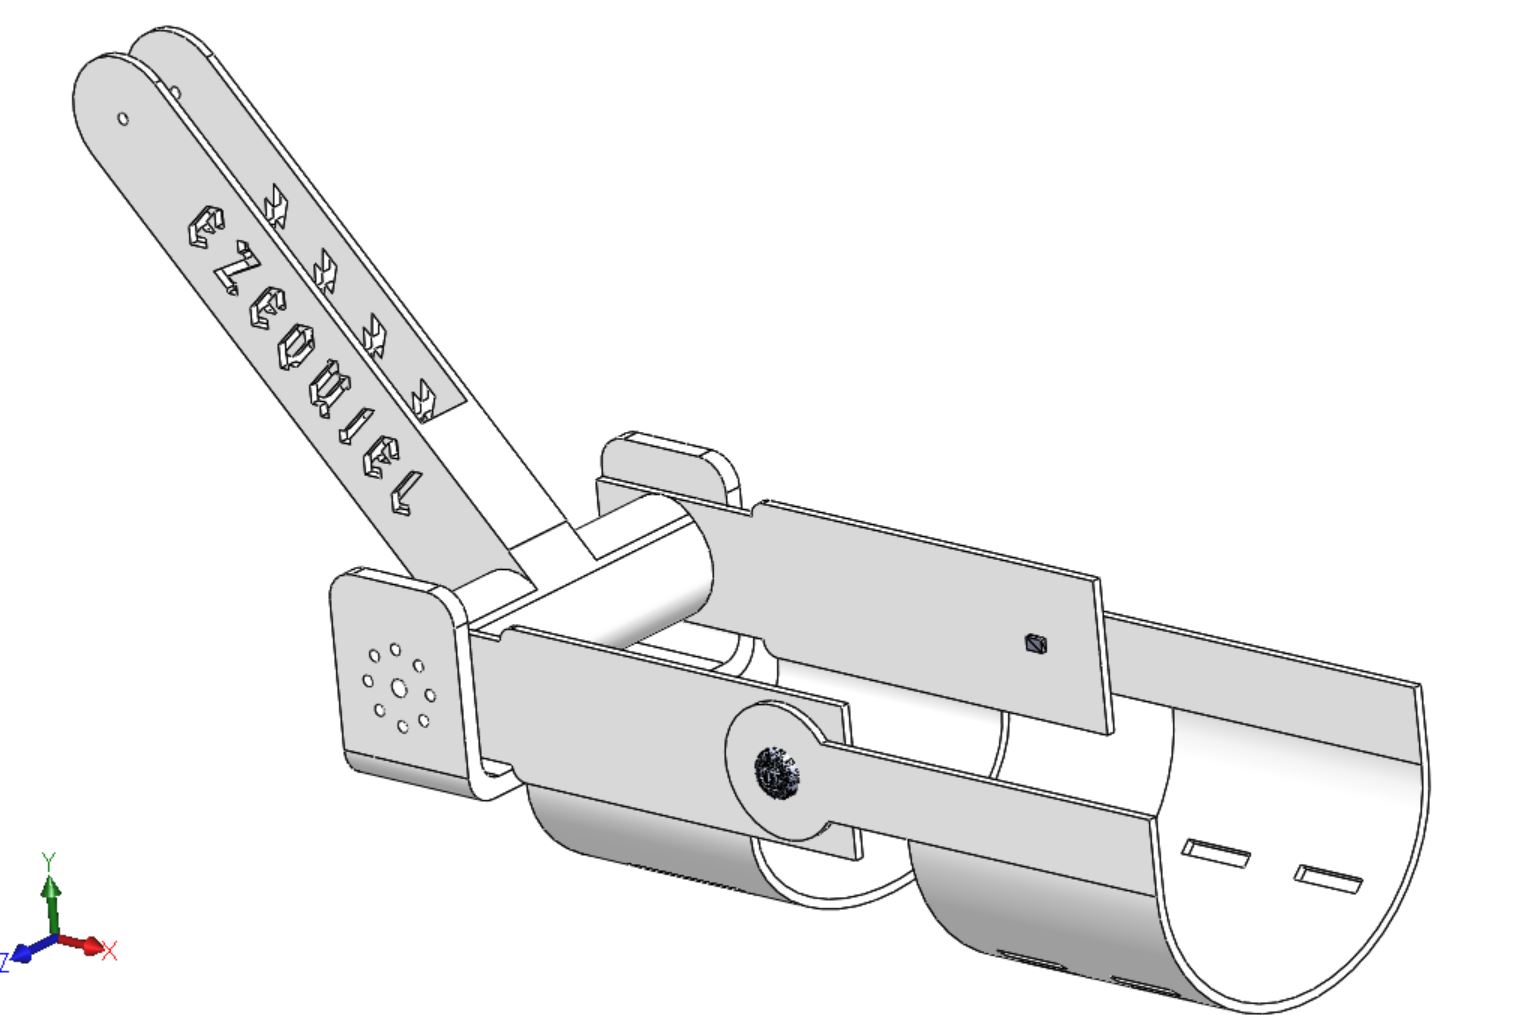
Nintendo Gameboy Project
This is the adaptation we have created for the Gameboy. The case is custom designed by us and is based on the original handheld Gameboy, with the internal components consisting of a Raspberry Pi Zero and an LCD display.
Rather than having all the buttons in their standard locations, they can be adjusted to the needs of the recipient. Traditionally, we adapt the controllers for recipients with limb differences that need to hold it all in one hand. For example, for a recipient that needs to hold everything in his left hand, the d-pad is transferred to the back on the left-hand side. The design is not limited to just those adaptations.
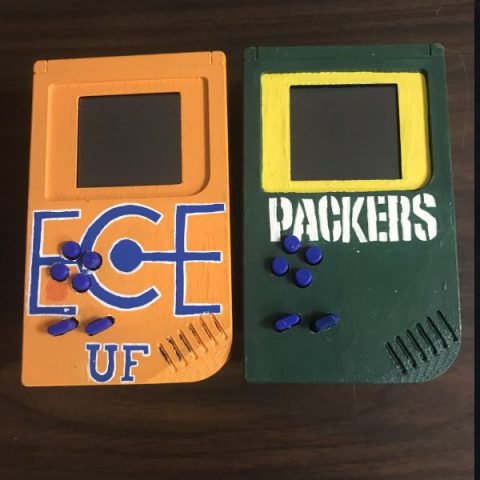
This means that the buttons can be moved to different locations on the case depending on the recipient’s needs. We can also adjust the size of the different buttons as well. If you would prefer a bigger screen, we can also install a port so it directly connects to a TV or monitor instead of the LCD display. The Gameboy case can also be adapted with jacks to accommodate larger adaptive buttons. We have buttons that are custom designed by our Solidworks team and can be plugged into the jacks.
These buttons are available by request and the CAD designs are also located on our Thingiverse account. If you prefer your own switches, the jack connections on the case are compatible with third-party buttons as well.
As for games, the system itself can emulate the games that are located on NES, SNES, Gameboy, Gameboy Color, and Gameboy Advance Devices. We can upload any game released from those consoles for the recipient to enjoy, including the original Mario, Zelda games, and more. Multiple games can be uploaded and we will include a manual on how to access these different games.
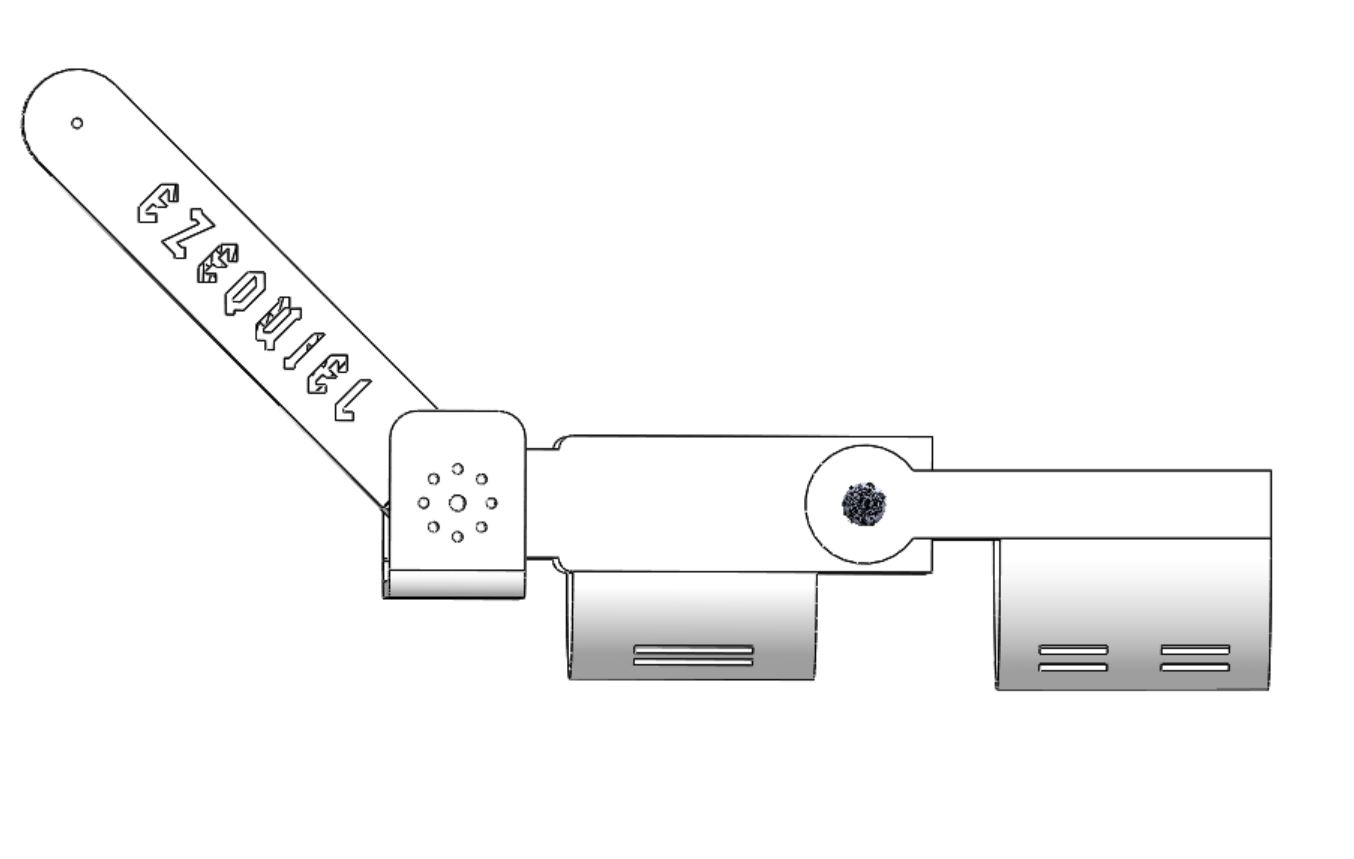
Sony Play Station 4 Joystick Project
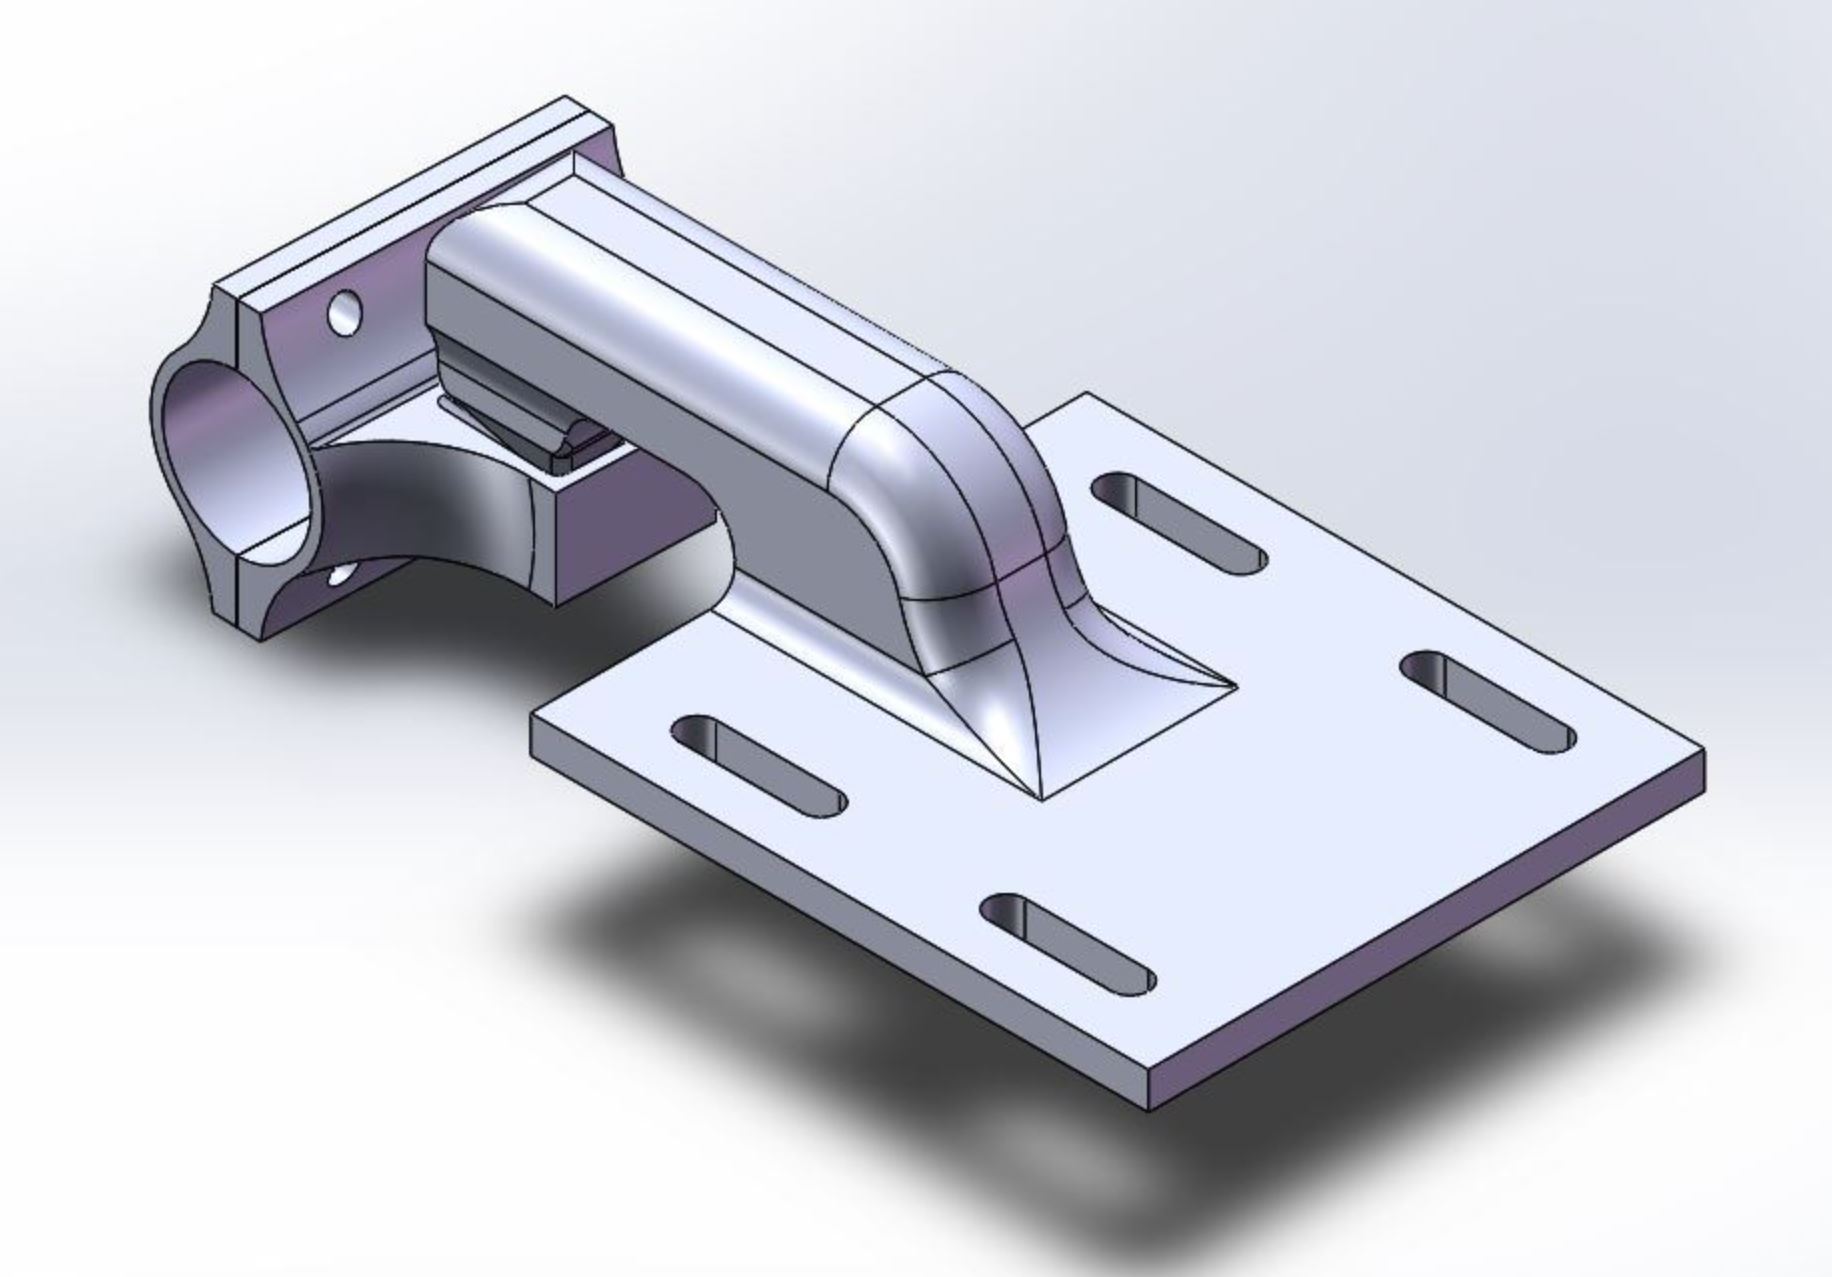
This project focuses on turning the PS4 controller into a single joystick design. It can be adapted to be used with either the left or right hand. The image isn’t exactly correct but we don’t have a complete controller yet. The left analog stick is on the bottom of the controller and the right analog is at the top. The trigger buttons (R1/R2, L1/L2) are located at the top of the front face and are meant for the pointer and middle fingers.
The pinky and ring fingers control the face buttons (△, O, X, □), which are located just below the trigger buttons. The D-pad and the rest of the buttons are on the top face of the joystick with the right analog stick and all of those are meant to be reached by the thumb.
Child’s Wheelchair
Our team is building a cost-efficient electric wheelchair out of a power-wheel cart. Our current design is meant for children ages 4-7. This wheelchair will include devices such as an ultrasound for obstacle detection and a PVC exoskeleton for support.
The wheelchair moves by pushing a joystick that sits on the right side of the chair that is connected to an Arduino underneath the seat. the joystick is designed to be pointed in any direction with the speed being controlled independently as a dial attached adjacent to the joystick. The Arduino also connects the ultrasound with a piezoelectric, so when an obstacle is detected an alarm sounds to alert the driver to stop moving.
The wheel chair is powered by a batter connected to a motor also located underneath the seat. Our last improvement to the chair is a modification to the seat itself. Extra padding has been added for comfort and a seat belt has been added for safety. Overall we are hoping to produce this wheelchair for about $300, which is approximately $1,700 under the normal market price. In the future we plan to adapt the wheel chair to recipients specific requests as we plan to use this chair as a base model. Per request, we will add either additional ultrasounds, or a different additive device to help with that specific recipient’s disability.
Hands & Assistive Devices
Drumstick Prosthetic
When adapting this device to different recipients, the main thing to take into account is the overall length needed. How much shorter is the recipient’s arm compared to their other arm? Drumsticks are typically held in the fingertips, so the distance from where the end of their arm fits the screw at the end of the DrumstickHolder should be equivalent to the distance from that same point on their other arm to the fingertip. The other main thing to consider is the width needed. Based on the width of the recipient’s arm and the thickness of foam used, each of the arm portions should be adjusted. When the arm components are changed in width, the drumstick holder and DHConnector width must be adjusted accordingly.
- Drumstick Holder –This component is designed to hold a standard drumstick based on the ones in the GRiP lab. It is held via a hook and spring, the spring requires testing based on recipient need and the cutout designs on either side can be altered to the recipient’s liking. The drumstick is attached at the tip side by a #8 screw within a small plastic cylinder to allow for rotation. This component is attached to the DHConnecter via [4 #8 screws and 1 1/4″ screw] on either side and can be rotated via the screws to 0 degrees, 45 degrees, or 90 degrees. The rotation allows for different drumming styles. The length of this component can be adjusted based on the length of the recipients arm.
- DHConnector – This holds together the Ddrumstick holder and forearm via [4 #8 screws and 1 1/4″ screw]. The width may need to be adjusted based on the width of the recipient’s arm Forearm: The forearm holds user’s arm via 1″ velcro strap looped through bottom (allows for more mobility in forearm). The width may need to be adjusted based on the width of the recipient’s arm. It connects to the upper arm via a rotating pin connector. This component has foam on the inside for comfort and fit.
- Upper Arm – The upper arm holds user’s arm via two 1/2″ velcro straps looped through bottom (allows for more stability in upper arm). The width may need to be adjusted based on the width of the recipient’s arm. This component will have foam on the inside for comfort and fit.
- Drumstick – The drumstick is adapted to be able to hold a drumstick without drilling into the stick itself. It came in two parts so the recipient could still use their wrist for some movement.
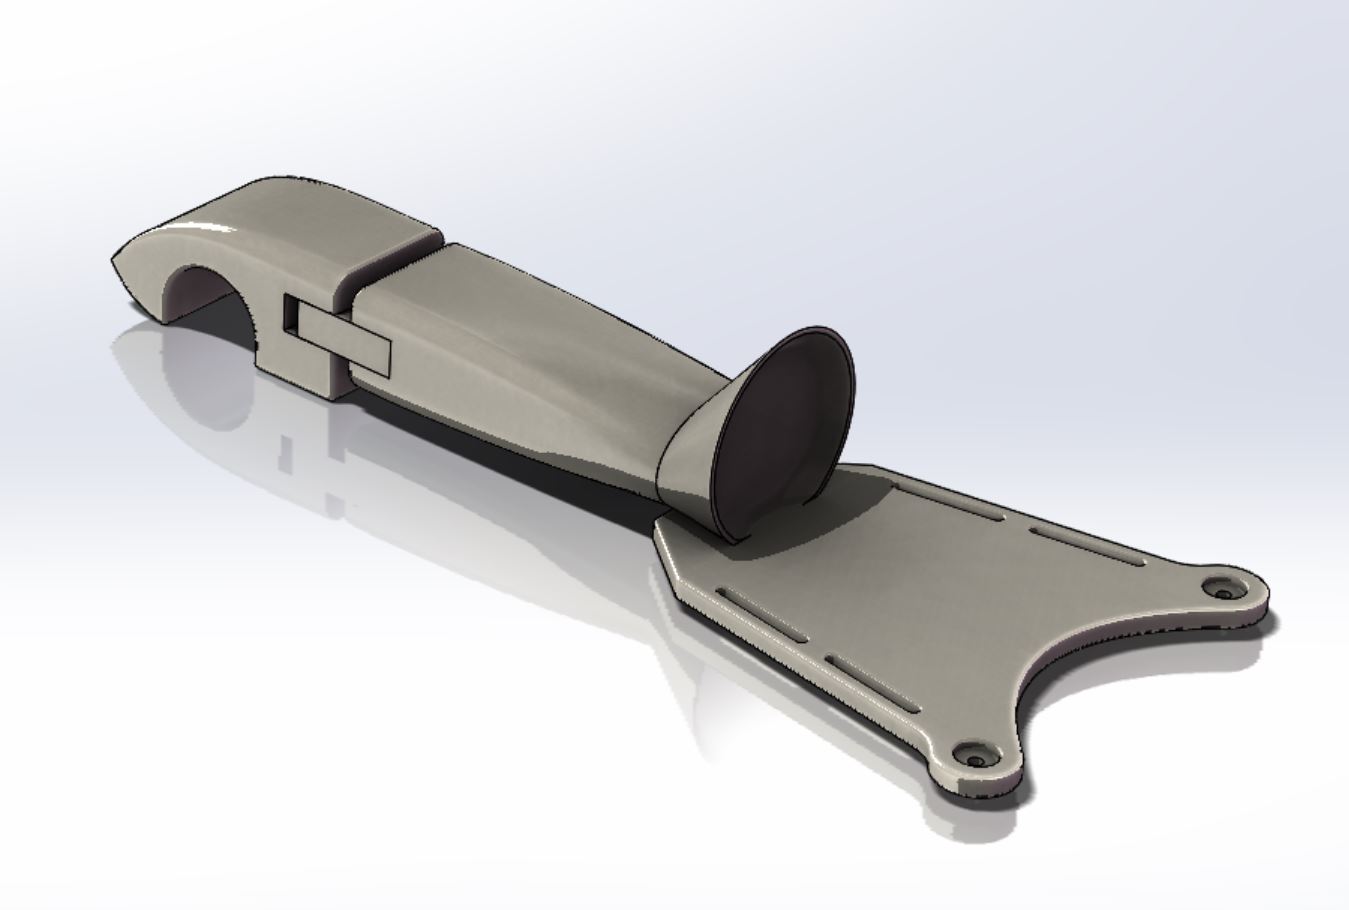
Bike Grip
The bike grip assembly was for a recipient that wanted to be able to safely ride and steer their bike. The design is actually three parts. Two are screwed together to attach to the bike handle and another attaches to the wrist.
The cup and holder design allow for them to maintain control of the bicycle in all directions while also remaining easily removable in case the user needs to safely pull their arm out in the case of a fall or crash.

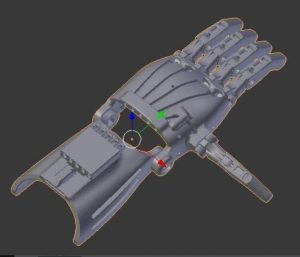
Raptor Reloaded Left Hand
The project team 103 worked on was a left raptor reloaded assembly hand. Using the natural motion of the wrist, the recipient is able to use the prosthetic to grip objects. This assistive device is capable of being adapted into specialized devices such as a drum stick hand or baseball bat hand through other 3D modeling software.
Unlimbited Arm
This is an E-Nable design. The Unlimbited Arm is an elbow-powered hand for kids who do not have a functioning wrist and are therefore unable to use wrist-powered devices. When they bend their elbow, the fingers close into a fist.

Bike-Riding Prosthetic
This device is designed to allow the recipient to hold a bike handle. The device maintains a similar form to a hand so that it is easy to use for the recipient and enables them to rapidly release the handle if necessary. The size of the device can be scaled to allow a variety of recipients to hold bike or scooter handles.